
A table saw is one of the most versatile tools in any workshop, but it’s also one of the most dangerous. Every year, thousands of woodworkers suffer injuries from kickback, binding, or simply having their hands too close to the spinning blade. That’s where a push block earns its place on your bench. It’s a simple tool, nothing fancy, no batteries required, but it keeps your fingers intact while delivering better cut quality. Whether you’re ripping narrow stock, crosscutting small pieces, or feeding material through a dado stack, a push block gives you control, pressure, and distance from the blade. If you’re serious about table saw safety, it’s not optional.
Table of Contents
ToggleKey Takeaways
- A table saw push block keeps your hands at a safe distance from the blade while delivering better cut quality through consistent downward pressure that prevents workpiece lifting and tearout.
- Push blocks outperform push sticks for most ripping operations because they distribute pressure across a wider surface area, making them ideal for narrow boards and materials prone to chattering.
- Proper technique—including setting blade height to ¼ inch above the workpiece, standing to the side of the cutting path, and maintaining steady feed pressure—is essential for safe and effective push block use.
- Commercial push blocks range from $12 to $40 depending on features like rubberized bases and adjustable heels, but building your own from plywood scrap and 2×4 lumber is a practical and cost-effective alternative.
- Table saws account for over 30,000 injuries annually in the U.S., making a push block a critical safety tool that extends your reach and keeps your fingers out of the danger zone during the final inches of a cut.
What Is a Table Saw Push Block and Why You Need One
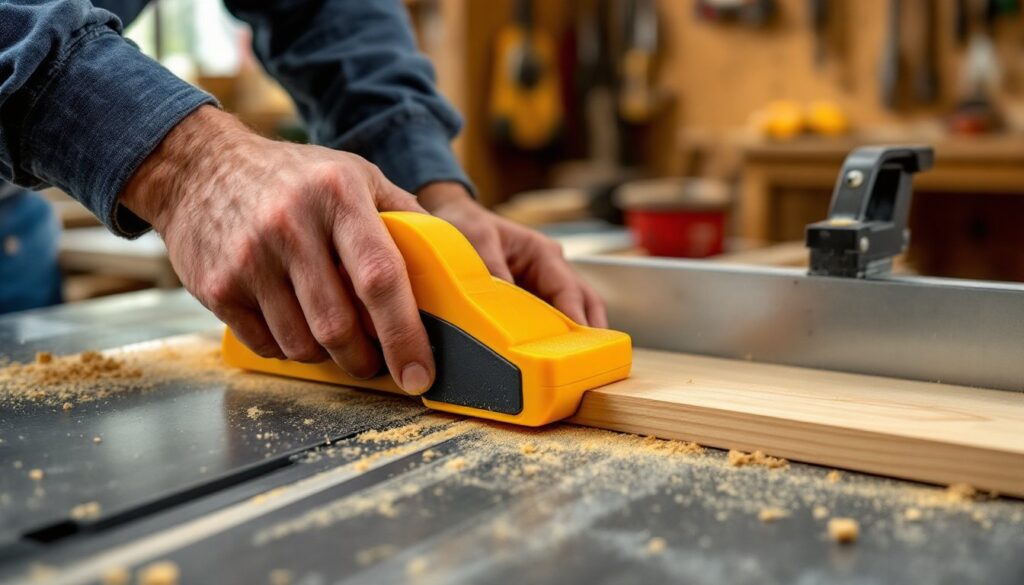
A push block is a handheld device used to guide workpieces through a table saw blade while keeping your hands at a safe distance. Most designs feature a flat base that rides on top of the workpiece and a vertical handle or grip for control. The base often includes a heel or rear lip that hooks over the trailing edge of the board, letting you push material all the way past the blade without your fingers creeping into the danger zone.
Unlike a push stick, which applies downward and forward pressure in a single line, a push block distributes pressure across a wider surface area. This makes it ideal for ripping narrow boards, cutting thin stock, or working with materials that tend to lift or chatter during the cut. The broader contact patch also reduces the risk of marring softer woods.
Safety is the primary reason to use one. According to the Consumer Product Safety Commission, table saws account for over 30,000 injuries annually in the U.S., many involving contact with the blade during the final inches of a cut. A push block solves that problem by extending your reach and keeping your hands above and behind the blade. It also improves cut quality, consistent downward pressure prevents the workpiece from lifting, which can cause burning, splintering, or kickback.
Beyond safety, a push block offers better control on small or awkward cuts. Ripping a 1×2 or trimming a thin edge becomes far less nerve-wracking when you’ve got a solid grip and your fingers aren’t hovering inches from carbide teeth. If you’re working with a zero-clearance insert or cutting dados, the added stability keeps your cut lines crisp and reduces tearout.
Types of Push Blocks: Finding the Right Style for Your Projects
Not all push blocks are created equal. The right choice depends on the stock you’re cutting, your saw setup, and how much control you need.
Standard Push Blocks
Standard push blocks are the workhorses of the shop. They typically feature a molded plastic or rubber base, a contoured handle, and a heel that hooks over the back edge of the workpiece. The base is usually 3 to 6 inches wide, giving you plenty of surface contact for boards up to about 4 inches wide.
Many commercial models include rubberized gripping pads on the base to prevent slippage on smooth or painted surfaces. Some designs have adjustable heels to accommodate different stock thicknesses. A quality standard push block runs $15 to $30, and most workshops should have at least two on hand, one for each side of the blade when ripping narrow stock.
These blocks excel at ripping operations where you need consistent downward and forward pressure. They’re less useful for very thin stock (under ¼ inch) or for crosscuts on a miter sled, where a push stick or simple dowel often works better.
Push Sticks vs. Push Blocks
Push sticks are narrower, lighter, and better suited for guiding stock from the side or pushing very thin material. A typical push stick is a flat piece of wood or plastic with a notch at the end that hooks the workpiece. It’s great for final feed pressure on the last few inches of a rip cut, especially when the offcut is too narrow for a push block.
But, push sticks don’t apply much downward pressure. If your workpiece tends to lift or chatter, a stick won’t solve it. That’s where a push block shines, it keeps the board flat against the table and the fence, reducing tearout and blade deflection. Many experienced woodworkers featured in workshop projects use both: a push block in the dominant hand for primary feed and downward pressure, and a push stick in the off hand to guide the fence side or catch the offcut.
For ultra-narrow rips (less than 2 inches), a push stick is often the safer choice because it keeps your hand profile narrower and farther from the blade. For everything else, the push block wins on stability and control.
How to Use a Push Block Safely and Effectively
Proper technique matters as much as the tool itself. Start by setting your blade height to about ¼ inch above the workpiece, enough to cut cleanly without excessive exposure. Make sure your rip fence is parallel to the blade to avoid binding and kickback.
Position the push block on top of the workpiece with the heel hooked over the trailing edge. Your grip should be firm but relaxed, white-knuckling it reduces feel and control. Stand slightly to the side of the cutting path, never directly behind the workpiece. This stance keeps you out of the kickback zone if the board binds and launches backward.
As you begin the cut, apply steady downward and forward pressure. Don’t rush the feed rate, let the blade do the work. If you hear the motor bogging down, you’re pushing too fast. If you see burn marks, you’re pushing too slow or your blade is dull. A smooth, consistent feed gives the cleanest cut.
Once the workpiece is about halfway through, shift your focus to the back end. Keep the push block engaged and continue feeding until the entire board clears the blade. Never pull the board back toward you with the blade spinning. If you need to stop mid-cut, turn off the saw and wait for the blade to stop completely before moving the workpiece.
For narrow rips, use a second push block or stick on the fence side to keep the workpiece tight against the fence. This prevents the board from drifting or twisting during the cut. Always wear safety glasses and consider hearing protection, most table saws run at 95 decibels or higher, well into the range that causes permanent hearing damage.
One often-overlooked tip from many step-by-step DIY tutorials: keep your push block clean. Sawdust buildup on the base reduces grip and can leave marks on finished stock. A quick wipe with a rag or a rinse under water (for plastic models) keeps it performing like new.
Choosing the Best Push Block for Your Workshop
When shopping for a push block, look for a few key features. A rubberized or textured base provides better grip, especially on smooth hardwoods or melamine. A contoured handle reduces hand fatigue during long rip sessions and gives you better control.
The heel design matters more than most people realize. A fixed heel works fine for standard ¾-inch stock, but if you work with a range of thicknesses, say, ½-inch plywood up to 8/4 hardwood, an adjustable or extended heel offers more versatility. Some commercial models let you flip the heel to accommodate thin or thick material.
Weight and balance also play a role. A lightweight push block is easier to maneuver, but a bit of heft can help maintain consistent downward pressure without extra effort. Most quality models weigh between 8 and 16 ounces.
If you’re working with larger sheet goods or wide boards, consider a push block with a wider base, 6 inches or more. This spreads pressure more evenly and reduces the chance of tipping or rocking during the cut. For small parts and thin stock, a narrower block or a combination push stick/block hybrid works better.
Don’t overlook visibility. Bright-colored handles (often orange or yellow) make the tool easier to spot on a cluttered bench and remind you to grab it before making a cut. Some woodworkers keep multiple push blocks staged around the saw, one by the on/off switch, one on the outfeed table, so there’s always one within reach.
If budget is tight, a basic Gripper-style push block runs $12 to $20 and covers 90% of home shop needs. Higher-end models from brands like Micro Jig or Bench Dog offer more ergonomic grips and better materials, typically in the $25 to $40 range.
DIY Push Block: How to Make Your Own
Building your own push block is a great first project if you’re new to the shop, and it costs almost nothing if you’ve got scrap lying around. You’ll need a piece of ¾-inch plywood or MDF for the base (about 4×6 inches), a chunk of 2×4 or 2×6 for the handle, and some wood glue and screws.
Start by cutting the base to size. A rectangle roughly 4 inches wide by 6 inches long works for most rip cuts. Sand the edges smooth, you don’t want splinters or rough spots catching on your workpiece.
Next, cut a piece of 2×4 to about 5 inches long for the vertical handle. Angle the top edge at about 15 to 20 degrees for a more comfortable grip. You can do this with a miter saw or a hand saw and some patience. Round over the top and front edges with sandpaper or a router with a ¼-inch roundover bit.
For the heel, cut a small block from scrap, about 1×2 inches and ¾ inch thick. Position it at the back edge of the base so it overhangs by about ½ inch. This lip hooks over the trailing edge of your workpiece. Glue and screw it in place from the underside of the base.
Attach the handle to the base with glue and a couple of 1¼-inch screws driven from the bottom up into the handle. Make sure it’s centered and square. Let the glue cure for at least an hour before using it.
To add grip, you can attach a piece of self-adhesive rubber shelf liner or sandpaper to the bottom of the base. The sandpaper works well on raw wood but can leave marks on finished stock, so save it for rough cuts. Rubber liner is gentler and reusable. Many woodworking project plans include variations on this basic design, some with angled handles or dual heels for different stock thicknesses.
A homemade push block won’t have the refined ergonomics of a commercial model, but it’s perfectly functional and gives you a chance to dial in the size and shape for your specific needs. Plus, if you accidentally run it through the blade, which happens, you’re out a few minutes and some scrap, not $30.