
When your Shark robot vacuum starts losing suction, won’t charge, or leaves the brushroll tangled with hair, you don’t need to haul it to a repair shop or order a replacement. Most common failures come down to a handful of wear parts, and if you know what you’re looking at, you can swap them yourself in under 20 minutes. A parts diagram is your roadmap. It shows you where each component lives, how pieces connect, and which part number you actually need. This guide breaks down the anatomy of Shark robot vacuums, walks through the most frequently replaced parts, and shows you how to use diagrams for accurate troubleshooting and repair.
Table of Contents
ToggleKey Takeaways
- A Shark robot vacuum parts diagram serves as both a shopping guide and diagnostic tool, showing component locations and part numbers for accurate troubleshooting and repair in under 20 minutes.
- The most common failures involve high-wear parts like brushrolls, filters, side brushes, and batteries—replacing these yourself can save hundreds in repair or replacement costs.
- Hair wrapped around axles, clogged filters, and corroded charging contacts are the top three mechanical failures preventable through weekly maintenance including bin emptying, sensor wiping, and brushroll cleaning.
- Use the exact part number from your Shark robot vacuum parts diagram rather than generic searches, as part numbers (typically 6–10 alphanumeric characters) guarantee correct replacement compatibility.
- Battery degradation after 300–500 charge cycles and filter wear every 6–12 months are predictable maintenance intervals that extend your vacuum’s lifespan to 3–5 years with routine care.
- Always unplug the dock, remove the battery, and follow the diagram’s reverse assembly sequence when disassembling—keeping screws organized and taking photos ensures safe, accurate reassembly.
Understanding Your Shark Robot Vacuum’s Main Components
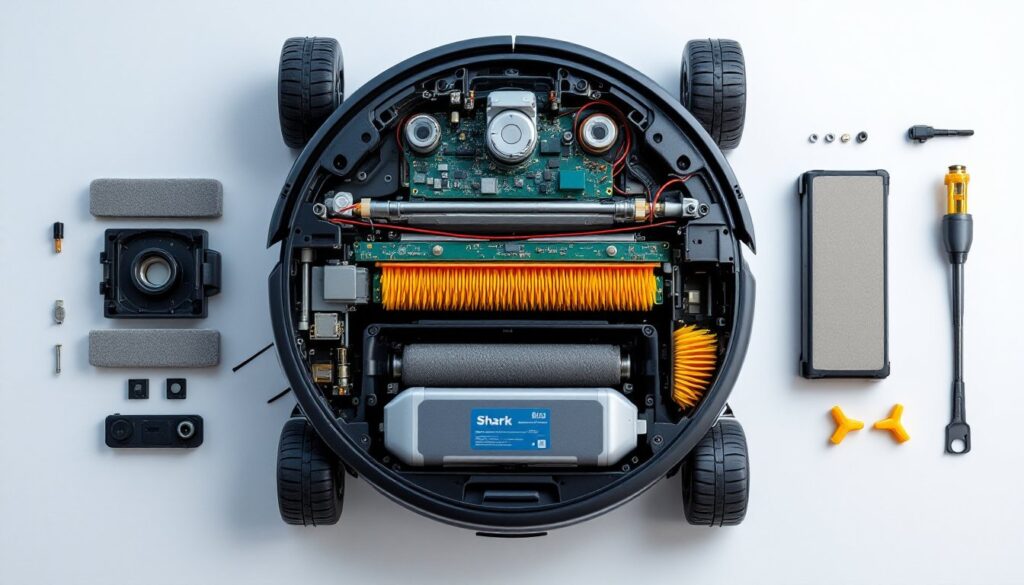
Shark robot vacuums share a common architecture across models like the IQ, ION, and AI series. Knowing the core systems helps you pinpoint failures fast.
Top shell and bumper assembly: The outer housing protects internal components and includes the bumper sensor array. The bumper uses infrared and mechanical switches to detect obstacles. If your vacuum keeps colliding with furniture or spinning in circles, the bumper sensors or springs may be damaged.
Dirt bin and filter chamber: Located on top or rear, depending on model. The bin holds debris, and a HEPA or foam filter sits between the bin and motor. Clogs here cause the “clean my bin” error even when it’s empty. The filter chamber often has a small silicone gasket, if that’s torn, suction drops.
Brushroll housing: Found on the underside. This chamber holds the main brushroll (sometimes called the “beater bar”) and side brushes. The brushroll is belt-driven or direct-mount, depending on the series. Hair wraps around the roller and bearing caps, eventually seizing the motor if not cleared.
Drive wheels and caster: Two large drive wheels provide propulsion: a front caster wheel pivots for steering. Drive wheels have rubber treads that wear down on tile or hardwood. If the vacuum wanders or can’t climb thresholds, check tread wear and axle debris.
Battery compartment and charging contacts: The lithium-ion battery pack sits in a bottom or side bay, accessed by removing screws. Charging contacts are spring-loaded metal pins on the underside that mate with the dock. Corrosion or bent pins prevent charging.
Navigation sensors: Depending on model, this includes cliff sensors (infrared emitters on the underside to detect stairs), lidar turrets (for mapping models), or camera modules. Dusty sensors cause navigation errors.
Shark publishes exploded-view diagrams in the user manual and on their support site. These diagrams label each part with an item number, which corresponds to the replacement part SKU. If you’ve lost your manual, search “Shark [model number] parts diagram PDF” to download it. Many repair enthusiasts also post annotated teardowns with part callouts.
Essential Replacement Parts and Where to Find Them
Not all parts fail at the same rate. Focus on high-wear components first.
Brushroll Assembly and Cleaning Mechanisms
Main brushroll: Typically a rubber-finned or bristle roller, 6–8 inches long. Rubber rollers (common on newer models) resist hair tangles better than bristles but can develop flat spots or tears after 12–18 months of daily use. Bristle rolls wear down and lose stiffness. Part numbers vary by series, confirm your model before ordering.
Side brushes: Three-arm or six-arm nylon brushes that sweep edges. They’re friction-fit onto a small motor shaft. Replace when bristles bend outward or break off. Sold in multi-packs: expect to swap every 3–6 months with heavy use.
Brushroll belt (if applicable): Some models use a small rubber belt to drive the brushroll. If the roll spins freely by hand but doesn’t turn during operation, the belt is likely stretched or snapped. Belts are inexpensive but model-specific.
Bearings and end caps: Brushroll bearings sit in plastic end caps on either side of the housing. Hair winds into the bearing, causing friction and noise. End caps can crack from impact. Clean bearings monthly: replace caps if cracked.
Filter set: Shark uses a combination of pre-motor foam filters and post-motor HEPA filters. Foam filters are washable but degrade after 6–8 washes. HEPA filters are not washable, replace every 6–12 months depending on dust load. Using a clogged filter reduces suction by up to 50% and can overheat the motor.
Where to buy: Shark’s official parts store, Amazon, and third-party retailers like SharkNinja or eVacuumStore. Aftermarket parts are cheaper but may not fit precisely. For critical components like batteries, stick with OEM. For consumables like filters and brushes, aftermarket options often perform fine, just check reviews.
Battery and Charging Components
Lithium-ion battery pack: Shark robots use 14.4V or 25.2V battery packs, depending on model. Capacity ranges from 2600mAh to 5200mAh. Battery life degrades after 300–500 charge cycles (roughly 1–2 years of daily use). Symptoms of a failing battery include short run times (under 30 minutes), failure to hold a charge, or the vacuum returning to dock immediately after starting.
Replacement batteries are available as OEM or third-party. OEM batteries cost $60–$100 but include a warranty. Third-party options run $30–$50, verify the connector type and voltage before buying. Some packs require basic soldering to install: others are plug-and-play.
Charging dock and contacts: The dock supplies 24V DC through spring-loaded pins. If the vacuum won’t charge, inspect the pins for corrosion or debris. Clean with isopropyl alcohol and a cotton swab. Bent pins can sometimes be straightened with needle-nose pliers, but replacement docks ($20–$40) are available if the circuit board is damaged.
Power adapter: The dock plugs into a wall adapter (typically 24V, 1.5A). If the dock’s LED doesn’t light up, test the adapter with a multimeter. Adapters fail less often than contacts but are cheap to replace.
Note: Replacing a battery is straightforward, remove screws from the bottom plate, disconnect the old pack, and connect the new one. No soldering is needed on most models. Wear safety glasses when handling lithium batteries: punctured cells can vent or ignite.
How to Use a Parts Diagram for Troubleshooting and Repairs
A parts diagram isn’t just a shopping list, it’s a diagnostic tool.
Step 1: Identify the symptom and isolate the system. Vacuum won’t charge? Focus on battery and dock components. No suction? Check the dirt bin, filters, and motor inlet. Won’t move? Examine drive wheels, motors, and sensors.
Step 2: Locate the part on the diagram. Most Shark diagrams are exploded views, showing components separated in 3D space with leader lines and item numbers. Cross-reference the item number with the parts list (usually a table below the diagram) to find the part name and SKU.
Step 3: Check for obvious damage. Remove the cover or panel to access the suspected part. Look for cracks, burns, corrosion, or debris. Hair wrapped around axles and bearing shafts is the #1 cause of mechanical failure in robot vacuums.
Step 4: Test before replacing. For electrical components (motors, batteries, sensors), use a multimeter to check continuity or voltage. A dead battery will show 0V: a healthy one should read within 1V of its rated voltage. A seized motor will show infinite resistance.
Step 5: Order the correct part. Use the exact part number from the diagram. Shark part numbers are usually 6–10 alphanumeric characters (e.g., XFFV650). Generic terms like “Shark robot filter” return dozens of results, part numbers guarantee a match.
Step 6: Follow disassembly order. Diagrams show the assembly sequence in reverse. Start with the outermost components and work inward. Keep screws organized by section (use a muffin tin or magnetic tray). Take photos at each step for reassembly reference.
Safety: Unplug the charging dock and remove the battery before any disassembly. Wear cut-resistant gloves when handling sharp edges on the housing or metal brushroll shafts.
For visual learners, many home appliance reviews and tech teardown guides include annotated photos that complement factory diagrams.
Maintenance Tips to Extend Your Shark Robot Vacuum’s Lifespan
Preventive maintenance cuts repair frequency in half.
Weekly:
- Empty the dirt bin after every 2–3 runs, even if it’s not full. Packed debris restricts airflow.
- Remove hair from the brushroll and side brushes. Use scissors or a seam ripper to cut tangles, then pull free.
- Wipe cliff sensors and bumper sensors with a microfiber cloth. Dust buildup causes false readings.
Monthly:
- Wash foam filters in warm water (no soap). Air-dry completely, 24 hours minimum. Damp filters promote mold.
- Inspect drive wheel treads for wear or embedded debris (staples, wire, pet claws). Pop wheels off the axle and clean the shaft.
- Check charging contacts on vacuum and dock. Clean with isopropyl alcohol.
Every 3 months:
- Replace side brushes (or sooner if bristles are flattened).
- Inspect the brushroll belt (if equipped). Replace if cracked or loose.
- Run a test charge cycle: fully discharge the battery, then charge to 100%. This recalibrates the battery management system on some models.
Every 6–12 months:
- Replace HEPA filter.
- Replace foam filters (even if they look clean, foam compresses and loses porosity).
- Open the brushroll housing and clean bearing sockets with a toothbrush and compressed air.
Storage: If storing the vacuum for more than a month, charge the battery to 50–60% and remove it from the unit. Store in a cool, dry place. Lithium-ion batteries degrade faster when stored fully charged or in hot environments.
Avoid: Don’t run the vacuum over liquids, large debris (e.g., pet food, screws), or loose cables. These cause clogs, jam the brushroll, or short the motor. Don’t use compressed air on the motor or PCB unless you’re comfortable with electronics, moisture in the air can corrode traces.
Routine care prevents most of the issues that send vacuums to the landfill. A well-maintained Shark robot can run 3–5 years before major component replacement is needed.
Conclusion
A parts diagram turns guesswork into precision. Whether you’re swapping a worn brushroll, diagnosing a charging issue, or just trying to figure out where that rattling noise is coming from, the diagram gives you a clear view of what’s inside and how it all fits together. Keep a digital copy of your model’s diagram bookmarked, invest in a basic multimeter, and don’t skip the weekly cleanings. Most repairs take less time than driving to a repair shop, and you’ll know the job’s done right.