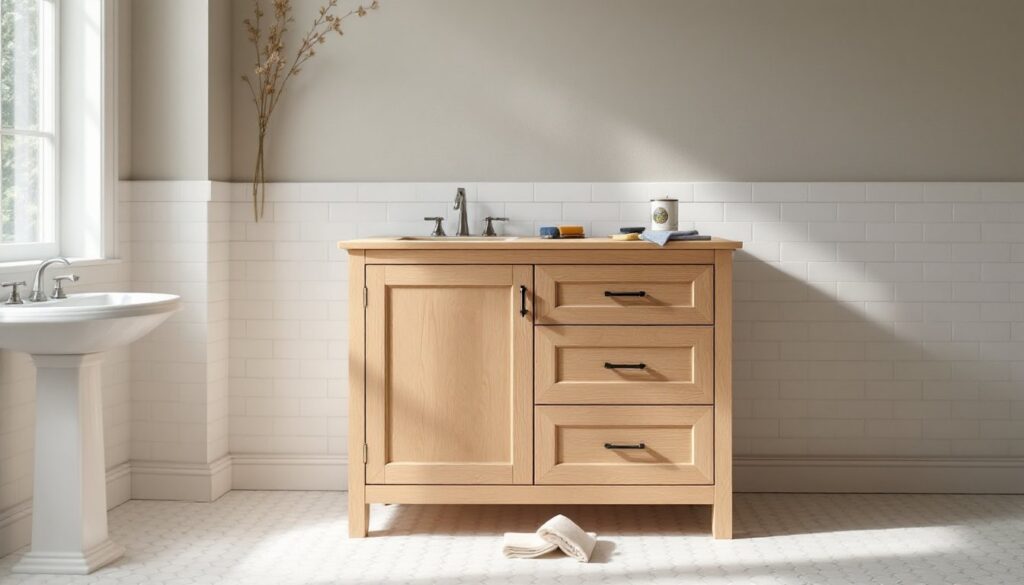

An unfinished bathroom vanity offers something most pre-finished units can’t: the freedom to match any aesthetic while keeping renovation costs in check. Whether retrofitting a dated powder room or anchoring a full bath remodel, these raw-wood cabinets let homeowners select the exact stain, paint, or sealed finish that complements their tile, fixtures, and lighting. Unlike factory-finished options that lock you into a specific color family, unfinished vanities arrive ready for the treatment that suits both the space and the skill level of the person wielding the brush.
Table of Contents
ToggleKey Takeaways
- An unfinished bathroom vanity costs 20–40% less than factory-finished equivalents while offering complete control over stain, paint, and finish selection.
- Unfinished vanities reveal wood quality upfront, allowing you to inspect grain, knots, and joint construction before purchasing and ensuring transparency for any stain or clear-coat project.
- Proper surface preparation, including sanding to 180-grit and applying wood conditioner before staining, prevents finish failures and blotchy results on species like maple and birch.
- Water-based polyurethane with at least three coats provides superior moisture protection in bathroom environments, significantly outlasting wax-only finishes in high-humidity spaces.
- An unfinished bathroom vanity works as a blank canvas for custom finishes—from gel stain and chalk paint to two-tone designs and distressed effects—enabling personalized aesthetics impossible with pre-finished units.
- Material costs for unfinished vanities ($200–$400 for a 36-inch oak model) leave budget room for upgraded hardware, stone countertops, and high-end faucets that elevate the entire bathroom remodel.
What Is an Unfinished Bathroom Vanity and Why Choose One?
An unfinished bathroom vanity is a cabinet constructed from raw wood, often oak, maple, birch, or poplar, that ships without any topcoat, stain, or paint. The manufacturer leaves the surface bare, allowing the installer to apply whatever finish matches the design scheme. Some units arrive lightly sanded: others require additional prep before the first coat of primer or stain.
Homeowners and remodelers choose unfinished vanities for three primary reasons: cost control, customization, and material transparency. Factory finishing adds labor and overhead: stripping that expense reduces the purchase price by 20 to 40 percent compared to equivalent finished models. It also puts finish quality in the hands of the installer, an advantage when the goal is hand-rubbed wax, distressed chalk paint, or a specific sheen that big-box finishes rarely offer.
An unfinished piece also reveals wood quality upfront. Knots, grain direction, and joint construction are visible before money changes hands. For anyone planning to stain rather than paint, that transparency matters: a clear polyurethane will highlight every flaw the factory might have hidden beneath opaque enamel.
Top Benefits of Installing an Unfinished Vanity in Your Bathroom
Cost Savings and Budget Flexibility
Material cost for a 36-inch unfinished oak vanity typically runs $200 to $400, compared to $350 to $600 for a factory-finished equivalent in the same species and construction grade. That delta leaves room in the budget for upgraded hardware, a stone countertop, or a higher-end faucet. Finishing supplies, sandpaper, primer, stain, polyurethane, brushes, and tack cloth, add another $40 to $80, depending on product grade and number of coats.
Labor savings appear when the installer handles the finish work during evenings or weekends, eliminating the markup a cabinetmaker or refinisher would charge. Many home renovation cost guides estimate professional cabinet finishing at $50 to $100 per linear foot, which quickly erodes any savings from buying unfinished if the work is outsourced.
Complete Design Control and Customization
Unfinished vanities accept any topcoat chemistry: water-based polyurethane for a low-VOC clear coat, oil-based poly for amber warmth and durability, gel stain to even out blotchy wood, or milk paint for a vintage farmhouse look. Hardware holes are often pre-drilled on standard 3- or 4-inch centers, but the lack of finish means repositioning or plugging those holes is straightforward if custom pulls require a different layout.
Stain matching becomes possible when the vanity needs to align with existing cabinetry, trim, or furniture. Mixing semi-transparent stains or layering glazes allows precise color control that off-the-shelf finishes can’t replicate. For bold design moves, ombré gradients, two-tone drawer fronts, or stenciled patterns, the bare wood is a blank canvas.
How to Choose the Right Unfinished Bathroom Vanity for Your Project
Start by measuring the installation footprint: width, depth, and height. Standard vanity depths run 18 to 21 inches: shallow powder-room models sit at 16 inches. Allow at least 2 inches of clearance on each side for trim, baseboards, and plumbing access. Verify the drain and supply-line locations align with the cabinet’s back panel or pre-cut service holes.
Wood species affects both workability and grain visibility. Oak delivers prominent open grain that takes stain boldly but requires grain filler for glass-smooth finishes. Maple is tight-grained and blotch-prone without conditioner: it excels under paint. Poplar is affordable and paints well but lacks the beauty for clear-coat projects. Birch splits the difference with moderate grain and good stain acceptance.
Construction quality separates budget units from ones that will survive decades of humidity. Look for dovetailed or doweled joints rather than staples, plywood box construction instead of particleboard, and full-extension drawer glides rated for 75-pound loads. Face frames should be solid wood, at least ¾ inch thick. Avoid cabinets with visible MDF or laminated edges if planning to stain: these materials won’t accept pigment like solid wood.
Confirm whether the unit includes a countertop or arrives as a cabinet only. Many unfinished vanities ship without tops, letting buyers install granite, quartz, marble, or butcher block separately. If the vanity includes an integrated top, verify the sink cutout matches the chosen basin, undermount, drop-in, or vessel, and that faucet holes align with the fixture’s spread.
Finishing Your Bathroom Vanity: Step-by-Step Guide for DIY Success
Safety first: Wear nitrile gloves, safety glasses, and a respirator rated for organic vapors when working with oil-based stains or solvent finishes. Ensure adequate ventilation: bathroom fans alone rarely move enough air.
-
Prep the surface. Remove all doors, drawers, and hardware. Sand with 120-grit sandpaper to smooth mill marks, then progress to 180-grit for a refined surface. Wipe with a tack cloth to remove dust: compressed air helps clear routed edges and hinge mortises.
-
Apply wood conditioner (if staining). Species like pine, maple, and birch benefit from pre-stain conditioner applied 15 minutes before stain. This evens absorption and reduces blotching. Skip this step if painting.
-
Prime (if painting). Brush or roll a coat of bonding primer, shellac-based or acrylic, onto all surfaces. Let dry per label instructions (typically 1 to 2 hours), then sand lightly with 220-grit to knock down raised grain. Tack-cloth again.
-
Stain or paint. For stain: apply with a foam brush or lint-free cloth, working in the direction of the grain. Let penetrate 5 to 15 minutes, then wipe excess. A second coat deepens color. For paint: use a high-density foam roller for flat surfaces and a 2-inch angled brush for edges and details. Two coats minimum: sand between coats with 220-grit.
-
Seal the finish. Once stain or paint is fully cured (check manufacturer dry times), apply three coats of water-based polyurethane or two coats of oil-based poly. Sand lightly with 320-grit between coats. The final coat should cure at least 72 hours before installing hardware or exposing to moisture.
-
Reassemble and install. Reattach doors, install pulls or knobs, and slide drawers back into glides. Level the vanity during installation: shim as needed to prevent door misalignment.
Common mistakes often mirror broader remodeling mistakes to avoid, like rushing cure times or skipping surface prep. Patience during each drying phase prevents finish failures that require stripping and starting over.
Popular Finish Options and Techniques to Consider
Clear polyurethane over stain remains the workhorse for vanities. Oil-based poly adds an amber cast and resists water better than early-generation water-based formulas, though modern water-based products close that gap with less odor and faster dry times. Expect 350 to 400 square feet per gallon at recommended film thickness.
Painted finishes suit modern, transitional, and cottage aesthetics. Satin or semi-gloss sheen balances cleanability with a forgiving look that hides minor imperfections. White, gray, and navy dominate current trends, but bold jewel tones, emerald, sapphire, charcoal, add personality without overwhelming small spaces. Chalk paint delivers a matte, velvety surface but requires wax or poly topcoat in high-moisture environments.
Gel stain works well on woods that blotch or when an opaque, paint-like coverage is desired while still showing some grain texture. It sits on the surface rather than penetrating, so application technique matters: thin, even coats prevent lap marks.
Distressing and glazing introduce age and dimension. After base paint dries, sand edges and high-wear areas with 150-grit to reveal raw wood, then seal. Glazing involves brushing thinned paint or stain over a sealed base coat, then wiping selectively to leave pigment in crevices and panel details.
For eco-conscious projects, water-based finishes and low-VOC stains reduce off-gassing. Many DIY repair tutorials now feature these products as primary recommendations, reflecting tighter indoor-air-quality standards.
Sealing requirements in bathrooms exceed those in dry climates. Three coats of polyurethane minimum: five coats on horizontal surfaces (like an integrated wood countertop) if water exposure is frequent. Avoid wax-only finishes unless the vanity sits in a powder room with minimal use. Humidity fluctuations demand a film-forming barrier, not just a sacrificial layer that wears away.
If the vanity will live in a rental property or a home staged for sale, neutral tones and durable topcoats maximize appeal and longevity. Bold color experiments work best in owner-occupied spaces where personal taste drives decisions.