
Hunting for the ice maker switch on your Whirlpool fridge can feel like looking for a needle in a haystack, especially when you’re trying to shut off a malfunctioning unit or turn it back on after a water line repair. Unlike the obvious thermostat dial, Whirlpool’s ice maker controls aren’t always in plain sight, and their location varies considerably depending on your model and when it was manufactured. This guide walks through the most common switch locations across different Whirlpool refrigerator configurations, explains how to operate them correctly, and covers what to do when the switch seems to have vanished entirely.
Table of Contents
ToggleKey Takeaways
- Whirlpool refrigerator ice maker on/off switch locations vary by model type—look for wire arm shutoffs on older units, paddle switches on mid-range models, or electronic controls on newer digital models.
- For side-by-side and French door refrigerators, the ice maker switch is typically located on the freezer compartment’s left side or on the module itself after removing the ice bin.
- Wire arm shutoffs should be lifted horizontally to turn off ice production and pushed down to turn on; paddle switches usually slide or flip with clear on/off labels or I/O symbols.
- If you cannot find the switch, check your model number (on an interior door sticker) and download the manual from Whirlpool’s online support library to locate the specific control for your unit.
- Always wait 24 hours after turning the ice maker back on before expecting ice production, and remember to empty the ice bin before extended shutdowns to prevent frost buildup.
Understanding Your Whirlpool Ice Maker Control System
Whirlpool has used several different control mechanisms over the years, which is why there’s no single answer to where the switch lives. The three most common types are:
Mechanical wire arm shutoff: A thick wire or plastic arm attached to the ice maker module itself. When lifted to the horizontal or up position, it stops ice production. This is the oldest and simplest design, found on many models from the 1990s through mid-2010s.
Paddle or slide switch: A physical on/off switch, usually green, white, or red, mounted either on the ice maker unit or on the interior freezer wall. Flip it to one side to disable ice production.
Electronic touchpad control: Newer models (especially those with digital displays on the door) control the ice maker through the main control panel. There’s no physical switch on the ice maker itself, everything runs through the interface.
Knowing which type you have narrows down where to look. Check your model number (usually on a sticker inside the fridge compartment, near the door hinge) and reference your owner’s manual if you still have it. Whirlpool’s online support library lets you download manuals by entering your model number.
One key detail: many DIY repair tutorials reference the wire arm as a “feeler arm” or “bail arm.” It’s the same component, it senses when the ice bin is full and shuts off production automatically.
Common Whirlpool Ice Maker Switch Locations by Model Type
Side-by-Side and French Door Models
For side-by-side refrigerators, the ice maker sits in the freezer compartment on the left side. Open the freezer door and look for:
- Wire arm: Extends from the front or side of the ice maker module. If it’s horizontal or raised, ice making is off. Lower it to the down position to turn it on.
- Paddle switch: Usually mounted on the left interior wall of the freezer, near the ice maker. It’s often a small green or white toggle that slides or flips.
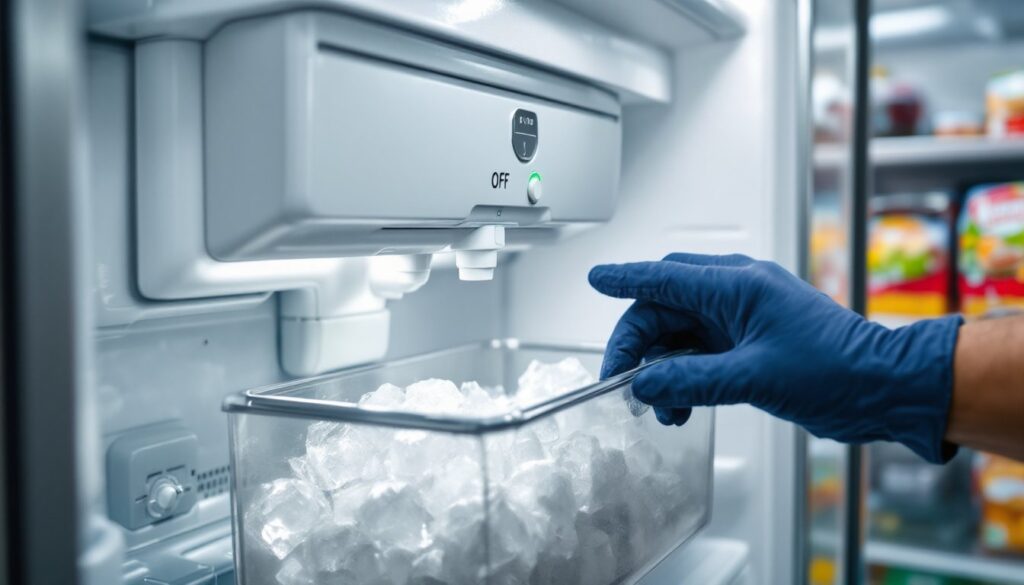
- On the ice maker itself: Some units have a red or green rocker switch on the lower front edge of the module, just above where ice drops into the bin.
French door models typically have the ice maker in the upper left corner of the freezer drawer. Pull the drawer fully open and remove the ice bin. The control is almost always on the ice maker module itself:
- Look for a green or white paddle switch on the right or left side of the unit.
- Alternatively, you might see a wire arm that pivots up and down.
- On models with in-door ice dispensers, the switch may be accessed by removing the ice bucket and looking at the module housing behind it.
If your French door model has a digital display on the exterior door, the on/off control is likely in the settings menu rather than a physical switch. Press the settings or options button and scroll to “Ice Maker” or “Ice Production.”
Top-Freezer and Bottom-Freezer Models
Top-freezer Whirlpool units are the most straightforward. The ice maker mounts on the left or back wall of the freezer. Common switch locations include:
- Wire shutoff arm: Positioned at the front of the ice maker. Horizontal = off, down = on.
- Slide switch on the module: A small plastic switch, usually white or green, on the front lower corner or side of the ice maker body.
- No dedicated switch: Older budget models may lack an on/off control entirely. To disable ice production, you’d need to shut off the water supply valve behind the fridge or lift the wire arm if present.
Bottom-freezer models with ice makers in the freezer drawer are similar to French door units. Pull the drawer out, remove the ice bin, and inspect the module. The switch is typically:
- A paddle or rocker switch on the side or front of the module.
- A wire arm extending from the front.
Some bottom-freezer Whirlpool models have the ice maker in the refrigerator compartment’s upper section instead. If that’s the case, open the fridge door, locate the ice maker (usually top left or in the door itself), and look for a small switch or control button on the unit housing.
According to home maintenance checklists, it’s good practice to turn off your ice maker if you’re going on vacation for more than a week to prevent potential leaks or jams.
How to Properly Turn Your Ice Maker On and Off
Once you’ve located the control, operating it is usually simple, but there are a few details that matter.
For wire arm shutoffs:
- Grasp the arm gently but firmly.
- To turn off, lift the arm to the horizontal (up) position until it locks or stays in place. You may feel slight resistance.
- To turn on, push the arm down to the lowest position. It should rest near or against the ice maker body.
- Don’t force it, if the arm won’t move, ice may be jamming the mechanism. Remove any ice buildup first.
For paddle/slide switches:
- Locate the switch (usually labeled “On” and “Off” or marked with I and O symbols).
- Slide or flip the switch to the desired position. Green often indicates “on,” red or white “off,” but not always, check for labels.
- You may hear a click or see an indicator light change if your model has one.
For electronic controls:
- Press the “Settings,” “Options,” or “Ice Maker” button on the door display.
- Navigate to “Ice Maker” or “Ice Production” using the up/down arrows.
- Select “On” or “Off” and confirm.
- The display should show the new status. Some models play a confirmation beep.
Important safety and functionality notes:
- Always empty the ice bin before turning the ice maker off for an extended period. Lingering ice can sublimate and cause frost buildup or odors.
- Wait 24 hours after turning on before expecting ice production. The system needs time to chill the mold and complete the first freeze cycle.
- Shut off the water supply if you’re disabling the ice maker permanently or for appliance repairs. The valve is typically behind the fridge at floor level or under the sink.
- Wear work gloves when reaching into the freezer to avoid cuts from sharp ice edges or cold burns from prolonged contact with frozen surfaces.
Many hands-on DIY tutorials recommend cycling the ice maker (turning it off, waiting 30 seconds, turning it back on) if production seems sluggish or inconsistent. This can reset the module’s internal timer and clear minor glitches.
Troubleshooting When You Can’t Find the Switch
If you’ve checked all the usual spots and still can’t locate a switch, consider these scenarios:
Your model may not have a dedicated switch. Budget or older Whirlpool units sometimes rely solely on the wire arm, or they lack any shutoff mechanism. In that case, your only option is to turn off the water supply valve or unplug the refrigerator briefly (though unplugging resets the temperature and isn’t ideal).
The switch is hidden behind a removable panel or ice bin. Some models require you to fully remove the ice storage bin and look at the back wall or the module housing. You may need to press tabs or lift the bin straight up and out.
It’s integrated into the door control panel. Models with water/ice dispensers on the door often bury the ice maker control in the electronic settings. Look for a “Control Lock” or “Settings” button, then navigate the menu.
The ice maker module was replaced or upgraded. Aftermarket or replacement modules sometimes use different switch designs than the original. If your fridge was serviced recently, the new part might have a different control location.
The switch broke off or is missing. Plastic paddles and wire arms can snap over time, especially in high-use households. If you see a small nub, broken clip, or empty mounting hole where a switch should be, you’ll need a replacement part. Whirlpool part numbers vary by model: cross-reference your model number on the Whirlpool parts site or a third-party appliance parts retailer.
Steps to take when you’re stuck:
- Locate your model and serial number (inside the fridge, on the door frame or sidewall).
- Download the user manual from Whirlpool’s support site. Search “[Your Model Number] ice maker switch.”
- Check for a wiring harness plug. If there’s no switch, some units let you unplug a small connector on the ice maker to disable it. This is a last resort and may trigger error codes on digital models.
- Contact Whirlpool support or consult a service tech if the fridge is still under warranty. Attempting to bypass safety controls or modify wiring can void coverage.
When to call a professional:
- The ice maker runs constantly and won’t shut off, even with the switch in the “off” position.
- You see water pooling under the crisper drawers or along the interior back wall, indicating a stuck water inlet valve.
- The control board or door display is unresponsive, suggesting an electrical fault that requires diagnostic tools and potentially part replacement under appliance service protocols.
Conclusion
Most Whirlpool ice maker switches hide in plain sight once you know where to look, either on the module itself, the freezer wall, or buried in the digital control menu. Take a systematic approach: identify your refrigerator type, remove any obstructions like the ice bin, and look for a wire arm, paddle switch, or electronic setting. If all else fails, the owner’s manual and Whirlpool’s model-specific support resources will get you the exact location and instructions for your unit.